


In this hands-on lab, we will be following the Terraform workflow: “Write > Plan > Apply” to deploy a virtual machine in AWS. After a successful deployment, we will then clean up our infrastructure and destroy 💥 the resource we created.
LEARNING OBJECTIVES
· Create a Directory and Write Your Terraform Code (Write)
· Plug the Provided AMI and Subnet ID Values Into Your Code
· Initialize and Review Your Terraform Code (Plan)
· Deploy Your Terraform Code (Apply), Verify Your Resources, and Clean Up
Let’s begin by logging in to the lab server using the credentials provided:

Our first step is to Create a Directory and Write Your Terraform Code (Write)
· Create a new directory in the cloud_user’s home directory to house your Terraform code called terraform_code using the following command.
mkdir terraform_code
Now to Change into that directory:
cd terraform_code
· We will use VI to create a new file for your code called: main.tf
· Add the provided code for creating your VM (as an EC2 instance in AWS) to the main.tf file.

Then press the ESC key and type :wq to save and exit the file.
Our next step is to plug the Provided AMI and Subnet ID Values into Your Code.
View the contents of the resource_ids.txt file that has been saved on the lab server, and type the following commands:
cat /home/cloud_user/resource_ids.txt
The ami and subnet_id values that have been saved in this file will be displayed.

Copy the AMI value. Mine shows as:
ami: ami-02b972fec07f1e659
subnet_id: subnet-0dc171ef6c7717814

Open the main.tf file that has the code:
vi main.tf (or you can press that up arrow key twice)
Paste the ami value into your code for the ami parameter, replacing the DUMMY_VALUE_AMI_ID placeholder text
Let’s escape using the same method we did earlier with :wq.
We’re going to do the same steps for subnet_id, save and exit again.

Yes, I went back and fixed my ami tag 😂
Initialize and Review Your Terraform Code (Plan)
Our first step in this section is to initialize the Terraform configuration and download the required providers, first, we will type in the following:
terraform init

We can review the actions that will be performed when we deploy the code.
terraform plan
Note: this is usually a read-only command. It goes into the AWS cloud and sees if it can actually deploy resources.
To summarize the output that is displayed, it will create 1 resource: the EC2 instance configured in the code. you will notice that only the ami, instance_type, subnet_id, and tags properties are configured, as that was included in our code.
Everything else, denoted with a + sign, will be created from scratch or will be populated when terraform creates the resource upon deployment.

On to the last step: Deploy Your Terraform Code (Apply), Verify Your Resources, and Clean Up.
Deploy the code with the following command:
terraform apply
When prompted, type yes and press Enter.
Once the code has been executed successfully, note in the output that 1 resource has been created.
Note: You could also use the terraform output command at any time in the CLI to view the output on demand.

Moving forward. Verify that the resource was created correctly in the AWS Management Console:
Navigate to the AWS Management Console in your browser > Type EC2 in the search bar and select EC2 from the contextual menu > On the Resources page, click Instances (running)
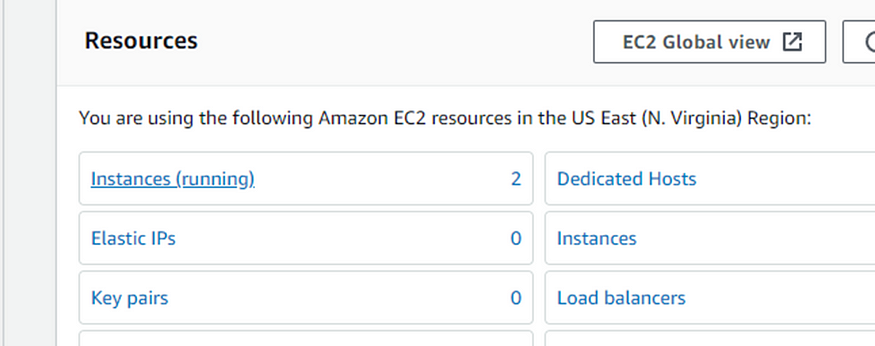
Verify that the instance, named my-first-tf-node (as configured in your code), appears in the list.

Back in the CLI, remove the infrastructure you just created:
terraform destroy
In the plan output, notice that it will destroy 1 resource
When prompted, type yes and press Enter. In the notifications displayed in the CLI, note that the aws_instance.vm resource you created is now being destroyed.

In the AWS Management Console, click the refresh button inside the Instances page and verify that the my-first-tf-node instance no longer appears in the list.

Congratulations — we’ve completed this hands-on lab! This was the first of many more projects dealing with terraform.

WRITTEN BY Biswaraj Sahoo --AWS Community Builder | DevOps Engineer | Docker | Linux | Jenkins | AWS | Git | Terraform | Docker | kubernetes
Empowering communities via open source and education. Connect with me over linktree: linktr.ee/biswaraj333